Arduino에 디스플레이를 달아보자!
Arduino에서 간단하게 데이터를 디스플레이 할 수 있는 LCD를 달아 보려고 합니다.
LCD는 현대에서 제작된 것으로 HC16202입니다.
- 5V 전원 공급
- 화면 밝기 조정
- 2 * 16 LCD
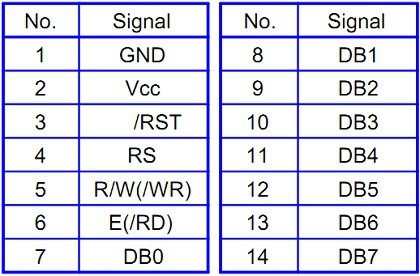
Arduino의 예제를 사용하려면 아래와 같이 배선되어야 합니다.

|
핀 속성 |
LCD Pin |
Arduino Pin |
|
Power 5V |
pin 2 |
5V |
|
GND |
pin 1 |
GND |
|
LCD R/W |
pin 5 |
GND |
|
LCD RS |
pin 4 |
Digital 12 |
|
LCD Enable |
pin 6 |
Digital 11 |
|
LCD DB4 |
pin 11 |
Digital 5 |
|
LCD DB5 |
pin 12 |
Digital 4 |
|
LCD DB6 |
pin 13 |
Digital 3 |
|
LCD DB7 |
pin 14 |
Digital 2 |
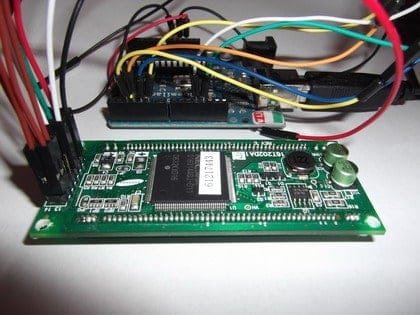
Arduino와 LCD 모듈의 배선이 끝나면, Arduino IDE에서 LCD용 Example소스를
Arduino에 다운로드하며 됩니다.
예제 : File > Example > LiquidCrystal > HelloWorld
코드는 아래와 같습니다.
// include the library code:
#include <LiquidCrystal.h>
// initialize the library with the numbers of the interface pins
LiquidCrystal lcd(12, 11, 5, 4, 3, 2);
void setup() {
// set up the LCD's number of columns and rows:
lcd.begin(16, 2);
// Print a message to the LCD.
lcd.print("hello, world!");
}
void loop() {
// set the cursor to column 0, line 1
// (note: line 1 is the second row, since counting begins with 0):
lcd.setCursor(0, 1);
// print the number of seconds since reset:
lcd.print(millis()/1000);
}
배선과 펌웨어 다운로드가 완료되면 아래와 같이 Arduino가 실행되어 LCD에 HelloWorld예제가 실행됩니다.

Fritzing file :
 arduino_lcd.fzz
'IOE > Arduino' 카테고리의 다른 글
| Arduino에 디스플레이(VFD)를 달아보자! (0) | 2013.12.07 |
|---|---|
| Breakout.js를 이용한 Arduino 시작하기 (0) | 2013.11.10 |


